iPhone: Slow Motion Videos
 The so-called “slo-mo” feature on the iPhone 5s, iPhone 6, iPhone 6s and up captures extremely fast action and makes all of the detail visible on your video. The cameras of recent iPhones can record around 120 fps (frames per second) or even 240 fps, which are then played back at a slower frame rate. If you do the math for converting this to the regular 30 fps, you’ll notice that time has been stretched. Thus we call it slow motion recording and this is a tutorial on how to create slow motion videos on your iPhone. No extra equipment needed!
Recording slow motion videos on your iPhone
“Camera” app > Slo MoRecording a clip in Slo Mo mode requires, of course, that you open the “Camera” app that is already preinstalled on your iPhone. At the bottom of the screen you’ll find a sliding menu that allows you to pick the operational mode.
Swipe your finger across the different modes to get to “Slo Mo”. Depending upon your iPhone model you’ll now notice 120 fps or 240 fps in the bottom right corner of the screen. Tap the “Record” button just as you usually would.
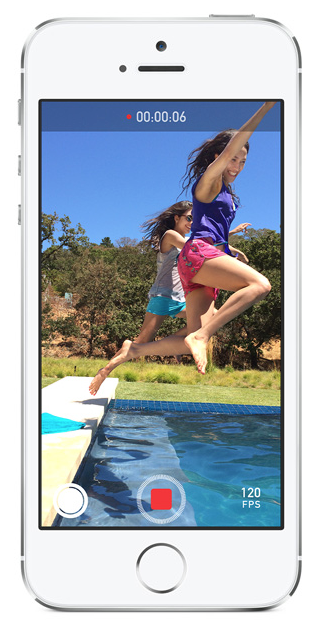
Hints: Try to pick a subject that is easy to keep in frame and moves rather quickly. Hold the iPhone as still as possible. Focus by tapping the subject before hitting “Record”.
Editing “Slo Mo” clips on iPhone
“Photos” app > Tap videoApple made slow motion videos on the iPhone even more impressive by adding a so-called “ramping” effect. Your videos begin playing at regular speed, slow down considerably to show the action in detail, then finally fade to regular speed before they end. But what it the actual part you wanted to see in “Slo Mo” isn’t played back correctly? For most videos, the fit is great, right out of the box. Some of them however, need to be adjusted. This is where the slow motion editing process comes in.
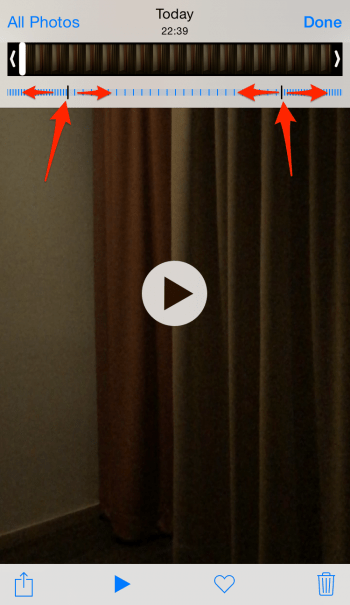
Open up your “Photos” app and tap the video in question. There will be a thumbnail row at the top, which allows you to trim the start and end position of the clip, just as with regular video clips. In addition to this control, you should notice a blue dashed timeline with more sparsely populated lines somewhere in the center. This is your slow motion editing tool. By adjusting the area that is less dashed, we can adjust the range of the video slowdown. Tap and hold one of the dark vertical grabbers on the blue timeline to begin. Shift it left or right to adjust. Do the same for the other grabber.
Now try playing the video. You should get a perfectly timed effect. If not, feel free to play with it as long as you like. There is no need to save anything, these settings are kept adjustable in a non-destructive way, allowing you to export several versions of the same video or modify the effect in the future. That’s it!