How To Enable Apple’s Live Photos Feature On iPhone 6s
 “Live Photos” are actually three second video clips that have been compressed in a very smart way, effectively only taking up the space of two regular photos on your iPhone 6s and iPhone 6s Plus. One and a half seconds show what happened before the photo, another one and a half seconds complete the story by showing you what happened after taking the picture. This is accomplished through continuous video recording and placing a marker at the time of shooting. While all of this stuff is happening under the hood, your iPhone 6s appears to just be taking regular pictures.
Here’s a little background and info on how to enable, shoot and view “Live Photos” on iPhone 6s and iPhone 6s Plus. Check out our guide and you’ll become an expert on “Live Photos” on iOS 9 and above in no time.
How to enable the “Live Photos” feature
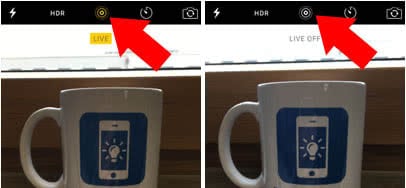
Camera > circular icon at the top of the toolbar [tap]Open up your “Camera” app and tap the icon made of several concentric circles, which will enable “Live Photos” for the next picture you take and stay enabled as long as the icon is blue. While the icon is white, “Live Photos” are temporarily disabled. You can toggle the feature on a picture-by-picture basis.
How to take a “Live Photo” on iPhone 6s (Plus)
Here’s a couple of hints on how to take the best “Live Photos” with your new iPhone. As mentioned above, the feature records part of the video before you actually press the trigger button. Due to this slightly confusing circumstance, we need to make sure to keep these things in mind:
- Press the shutter button only when your subject is properly focused. Pressing it too early will cause your “Live Photo” to contain some of the actual focusing action.
- Make sure to stay centered on your subject even after shooting, at least for a couple of seconds. If you pull away from the subject immediately or point the camera at the ground, this too will show in the final creation.
- Sound is also being recorded, keep that in mind. Especially loud bystanders or excessive talk during the shot will distract from the subject.
How to view “Live Photos”
Tap the thumbnail of the corresponding “Live Photo” you would like to view in the bottom right corner of your “Camera” app or by opening your “Photos” app and selecting the image. Press hard to trigger a “deep press” and view the full animation of your photo.
How to see if a photo has motion enabled: While swiping through your photos, pay attention to subtle motion, which will let you know of any “Live Photos” as opposed to regular shots. There is no other means of distinguishing between these types of images, at least for now.
Bonus hints
If you want to convert a “Live Photo” to a regular photo, for example to save on storage space or send it to someone with a limited size email inbox, you can do so using our guide. The image will be then stored as a regular JPEG photograph.
Another great guide of ours you should definitely check out is related to setting a “Live Photo” as your animated Lock Screen wallpaper.