How To Transfer Photos From iPhone To PC
 Apple and Microsoft aren’t friends and the relationship between the two companies is definitely noticeable in the user experience when using an iPhone and a Windows computer in tandem. While it has certainly gotten better in the past few years, some of the more common tasks are still a hassle when compared to solely using Apple products, which provides a better level of integration. Here’s our guide on how to transfer photos from iPhone to PC.
Contents
Transfer of photos from iPhone to PC (Windows)
There are three ways for getting your iPhone’s photos to appear on a Windows PC. You can either use the Windows Explorer and tread the iPhone as a camera or media device and manually copy the images to your hard drive. Another method is to use the Microsoft Photos app, which is available on all computers starting with Windows 8. And last but not least, we can use Apple’s cloud storage service iCloud to access and download our images to a desktop or notebook computer running Microsoft Windows. Which of the options you prefer is up to you. All three ways lead equally to the goal.
Note: If you use Mac OS X, things work a little differently. Check out our full guide on how to transfer photos from iPhone to Mac.
Transfer photos from iPhone to PC using Windows Explorer
Quick guide: Connect iPhone to PC → Windows Explorer → This PC → Internal Storage → DCIMSince some of the methods presented here are more complex than others, we want to start with the fastest and simplest way of transferring images from iPhone to PC by using the Windows Explorer. To do this, proceed as follows:
1. Connect your iPhone to a PC via USB cable and wait until the familiar “device connected” sound is played. If you are prompted to trust the computer on your iPhone, confirm that you wish to do so by tapping on “Trust”.
2. Then open up the Windows Explorer (folder icon in the taskbar) on the PC. Alternatively, you can enter “Explorer” in the search field at the bottom left and click on the corresponding search result.
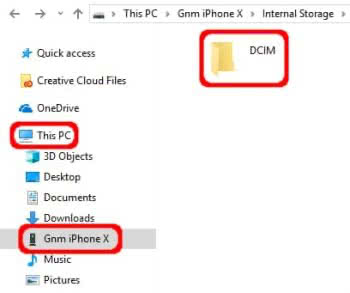
3. Your iPhone should be listed in the “This PC” section. By clicking it in the sidebar, you will be taken to the virtual root directory containing the Internal Storage section. Double-click it to reveal the DCIM Folder, which contains a set of folders which in turn contain all of your current photos. The folders are numbered in ascending order. The higher the numbering, the newer the photos are.
4. You can now drag and drop (click, hold and move) the photos onto your PC. Alternatively you can select the pictures you want to transfer (click and hold left mouse button + Ctrl), right-click and select “Copy”.
5. In any folder where you want to put the pictures, press the right mouse button again and choose “Insert”.
This method is quick and doesn’t require any extra software, but it’s also relatively clumsy due to the file system or folder structure employed in iOS.
Tip: Of course you can also transfer photos from PC to iPhone!
Transfer photos from iPhone to PC using Microsoft Photos app
Another easy way to transfer pictures from iPhone to PC is the Microsoft Photos app, which is pre-installed on all computers with Windows 8 or higher. To do this, proceed as follows:
1. Connect your iPhone to a PC via USB cable and make sure it’s turned on and unlocked. A pop-up on the iPhone may prompt you to trust your computer, which you confirm by tapping on “Trust”.
2. Now enter “Photos” in the search field at the bottom left and click on the corresponding search result to open the Photos app. Alternatively, click on the start button at the bottom left and select “Photos” from the list.
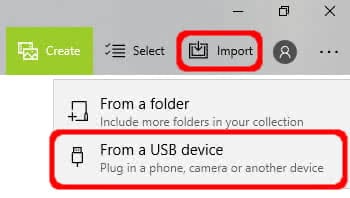
3. Now click on “Import” in the top right corner of the Photos app and select “From USB device”.
4. A window will open up with all the photos you can transfer from your iPhone to your PC. By default, all images are pre-selected for import. If you only want to transfer certain photos, simply click on “Unselect all” in the upper right corner. Afterwards you can select the respective pictures individually. Once you are done, click on the “Import selected” button.

5. The transferred photos now appear in the Photos app and in the “Pictures” folder on the PC. You can find the latter in the Windows Explorer under “This PC” → “Pictures”. All imported pictures are summarized in folders – sorted according to the respective creation date.
Transfer photos from iPhone to PC using iCloud
Apple’s cloud storage service iCloud lets you store all kinds of iPhone files and documents such as notes, calendars, contacts or photos. If you use iCloud Photos on your iPhone, all photos will automatically be uploaded to your iCloud. By default, every iPhone user has 5 GB of iCloud storage available for free.
You can then access and download your photos from your PC via the iCloud website. To do this, proceed as follows:
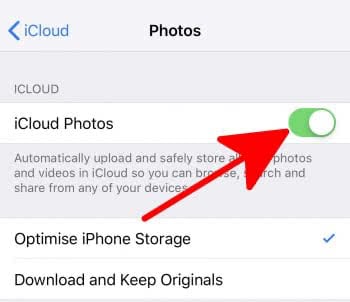
1. First of all, “iCloud Photos” must be enabled on your iPhone. You can activate the function under “Settings” → [Your Name] → “iCloud” → “Photos” → “iCloud Photos”.
2. Open up your favorite browser and go to iCloud.com on your PC. Next, log in using your username and password. For two-factor authentication, you may need to enter a six-digit code that will be displayed on your iPhone. After successfully logging in, click the “Photos” button on the iCloud home page.
3. On this page you can see all your iPhone photos that are stored in iCloud. Now click on the photos you want to download to your PC. To select multiple photos at once, press and hold the “Ctrl” key while selecting the photos. Finally, click on the download button (cloud with arrow pointing down) in the top right corner of the toolbar in order to download the marked images to your PC.

4. The downloaded photos are now stored in the “Downloads” folder on your PC. You can find it by entering “Downloads” in the search field at the bottom left. Alternatively you can open up the Windows Explorer and go to “This PC” → “Downloads”. In another article we show you how to download all icloud photos and save them locally.
Tip: Here’s how to manage iCloud storage on the iPhone!