How to Use Airdrop on iPhone
![]() AirDrop is a fast way to transfer files between Apple devices via Bluetooth in record time and without the hassle of cords, email or the likes. You can send contacts, images, information from the web, videos or locations from iPhone to iPhone, iPad, iPod or even your Mac without any prior configuration. We explain how to enable AirDrop and how to use AirDrop to transfer photos, data and files.
AirDrop is a fast way to transfer files between Apple devices via Bluetooth in record time and without the hassle of cords, email or the likes. You can send contacts, images, information from the web, videos or locations from iPhone to iPhone, iPad, iPod or even your Mac without any prior configuration. We explain how to enable AirDrop and how to use AirDrop to transfer photos, data and files.
Contents
AirDrop has been around for a while and received a few additional features in the course of time. Still, many iPhone users do not know about the numerous benefits of using AirDrop on iPhone. To use AirDrop your Bluetooth has to be turned on and you need a working WiFi connection. The receiving device also needs to activate Bluetooth and have a stable WiFi connection and activate AirDrop.
Compatibility – Who can use AirDrop?
The following devices are certified to work with Apple’s AirDrop protocol.
- iPhone 5/ iPhone 5s, iPhone 6/ iPhone 6 Plus, iPhone SE, iPhone 7/ iPhone 7 Plus, iPhone 8/ iPhone 8 Plus, iPhone X
- iPad 4th generation and up (including iPad Air & iPad Air 2)
- iPad Mini 1st generation and up (including iPad mini with Retina Display)
- iPod touch 5th generation and up
- on the Mac side of things, you’ll typically require a Mac from 2012 or newer
If your Mac does not show up we have a few tips on how to fix the issue. Find out what to do, when your Mac is not visible in AirDrop.
How to find AirDrop on iPhone
AirDrop can either be activated through the “Settings” or the Control Center both ways are quite easy to find.
Activate AirDrop in your Settings
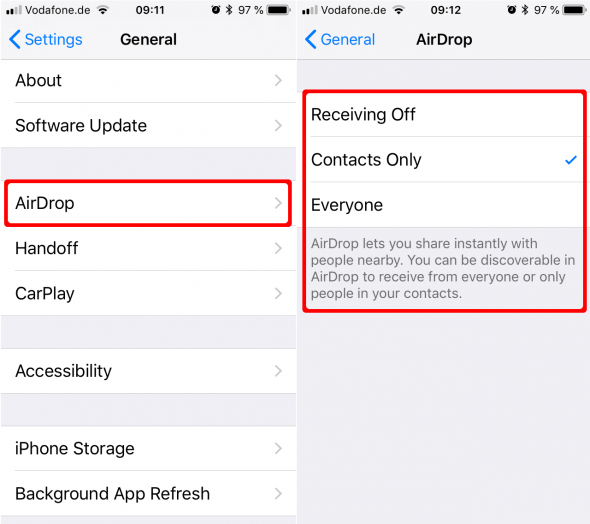
Settings → General → AirDrop → choose possible recipientsTo enable AirDrop in your Settings you first have to open your “Settings” app and go to “General”. Now tap “AirDrop” and choose who can receive your data and file transfers.
Activate AirDrop in the Control Center
To turn on AirDrop on your iPhone in your Control Center just swipe up from the bottom of the screen to open the Control Center. Now, depending on your iOS version you will see tiles organizing the different Control Center features.
Use 3D Touch (press firmly) to open the tile with Bluetooth, WiFi and Flight Mode Settings and activate AirDrop.
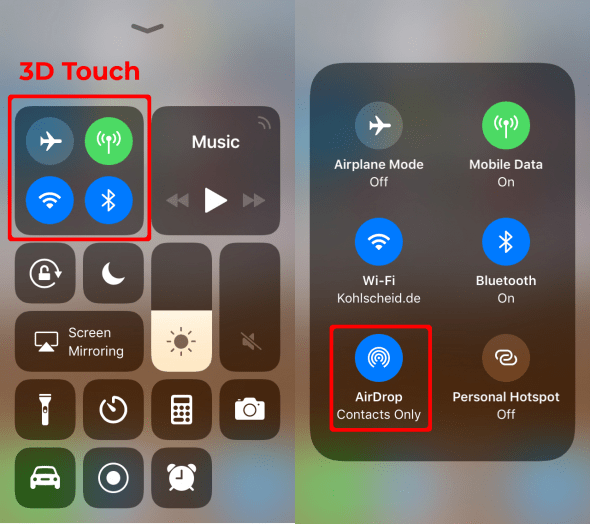
If AirDrop was disabled you can choose, who can receive your data and file transfers via AirDrop.

How to use AirDrop on iPhone
To use AirDrop on your iPhone successfully, you will have to enable WiFi and Bluetooth, independent of your current location. Your partner on the receiving end will have to do the same on his iOS device. Then you need to check if AirDrop is turned on.
Now find the type of content or data you would like to share within the designated app.
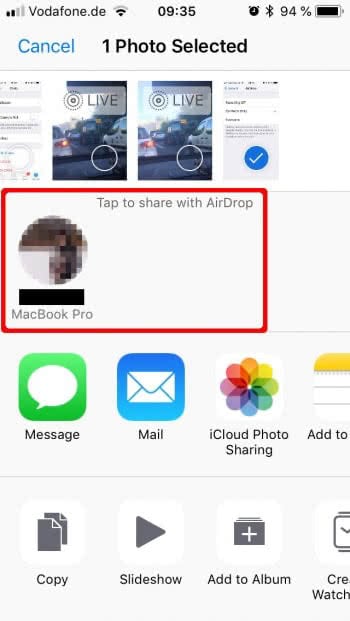
We used a photo for our example. The workflow is identical in every case, regardless of what you want to share. Tap the “Share” icon and afterwards the “AirDrop” icon.
After enabling AirDrop on both of the devices involved in the transfer, you should see a profile image of your receiving contact pop up as a destination. Tap the profile picture to start the transfer. This works exactly the same whether you are AirDropping to any other iDevice or a Mac.
Did you know you can also use AirDrop to transfer data from Mac to iPhone? Find out how to use AirDrop between iPhone and Mac.
How to receive AirDrop photos or data transfers
To receive AirDrop photos or data transfers your contact will see get a notification, where he or she can accept or deny the transfer simply by tapping the corresponding button. If the transfer is cancelled unintentionally, you can simply repeat the process to try again.
AirDrop works for single and multiple files, although there is a limit (depending on the type and size of the media) on the number of items you can transfer in one go.