How To Archive iPhone Backup & Don’t Overwrite Old Backups
![]() You are probably well aware that an iPhone backup can save your “life” in the case of a digital or hardware meltdown, because it is the only way to access some of your personal and sensitive data in case the iPhone becomes inaccessible for some reason. Aside from automatic iCloud backups, there is also the option of creating a full backup in iTunes which includes all of your content. By default, backups are overwritten to save space and only the latest backup will be available for restores. If you want to keep one of your iPhone backups that were made with iTunes for the event of an emergency, we suggest to archive your iPhone backup and protect it from being overwritten.
You are probably well aware that an iPhone backup can save your “life” in the case of a digital or hardware meltdown, because it is the only way to access some of your personal and sensitive data in case the iPhone becomes inaccessible for some reason. Aside from automatic iCloud backups, there is also the option of creating a full backup in iTunes which includes all of your content. By default, backups are overwritten to save space and only the latest backup will be available for restores. If you want to keep one of your iPhone backups that were made with iTunes for the event of an emergency, we suggest to archive your iPhone backup and protect it from being overwritten.
Creating an iPhone backup using iTunes
To archive a local backup, you must first make sure that you have in fact stored an iTunes backup on your machine. If you haven’t performed an iTunes backup of your iPhone in a while, we suggest checking out our guide on the matter and doing so before following the rest of the guide.
Quick guide:
- Connect iPhone to PC/Mac via USB cable
- iTunes > iPhone > Summary > Back up now

Archiving iTunes backups
This tutorial was created on Mac OS X, but should work just as well on Windows.
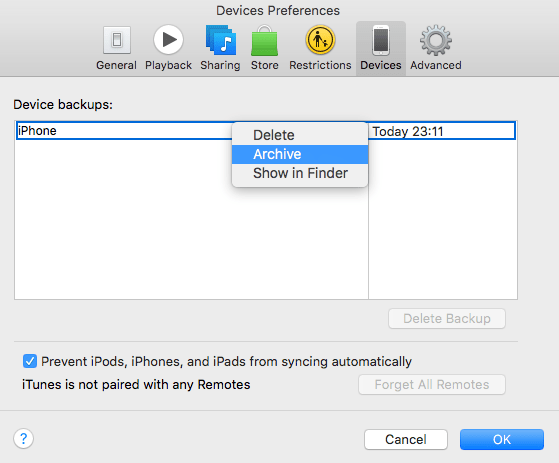
iTunes > Menu item: iTunes > Preferences > DevicesOpen up the iTunes application on your computer and click the menu bar item labeled iTunes or open up the main menu using the arrow if you’re on a PC. Then go to the Preferences. In there you’ll find a tab titled Devices. In the device tab, select your iPhone backup and right-click it. Select Archive. This will secure the backup and keep it from being overwritten. The archived backup will be available for restores, even if you create new backups via iTunes. A lock icon indicates that the backup is now secure.