How To Enable Dictation on iPhone
 You are tired of typing or just don’t have a hand free for typing, but still want to respond to a message. There is an easy solution to your predicament, just dictate your text to your iPhone using iPhone dictation. When using dictation, your eyes don’t need to stay on the screen so you can keep on walking or working and still answer to messages. This guide explains how to enable Dictation on iPhone for hands-free messaging.
Contents
You already know Siri, but did you know that you can use Voice Dictation on iPhone in pretty much any text entry situation? Messaging, taking notes, naming to-do items, writing emails, filling out forms, all of these tasks and more can be accomplished by simply talking into your iPhone’s microphone and letting it do the work for you. Apple’s iOS works extremely well when it comes to recognizing human speech and converting it to text.
Enable dictation on iPhone
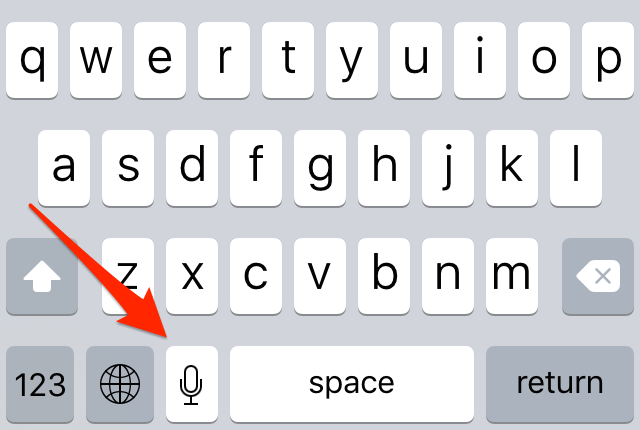
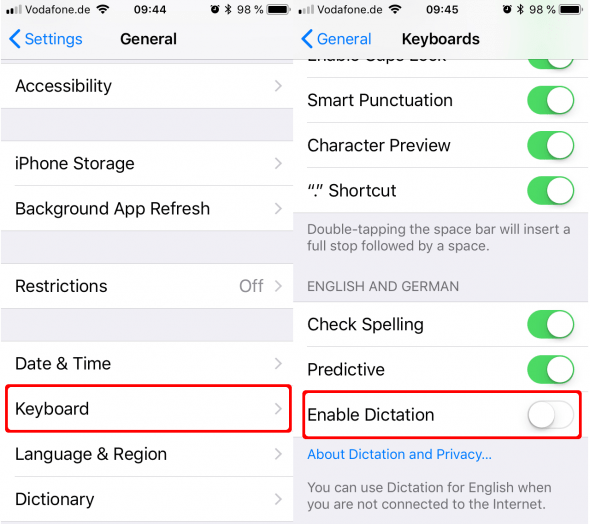
Settings → General → Keyboard → activate “Enable Dictation”To use dictation on iPhone, there has to be a microphone icon on your keybard. If you lack the microphone icon on your keyboard (bottom left), either the app you are currently using does not support dictation for the field you are typing into, or you’ve completely disabled it in your iOS settings.
Note: You can also use offline dicatation if you have an iPhone 6 or more recent model. Learn how to enable offline dictation here.
To enable dictation, go to “Settings” and “General”. Now tap “Keyboard” and scroll down to the bottom and activate the toggle next to “Enable Dictation”.
Note: Dictation is always related to the currently selected keyboard language. If you are using your iPhone in a multilingual fashion, make sure to pick the right keyboard locale for the language you’re going to be dictating.
Next press the microphone icon as seen on the first image. Wait for approximately one full or a half second before you start speaking, then begin dictating in a clear and steady manner. When you are done dictating, either just stop speaking or hit the “Done” button.
Improve iPhone dictation results
You can say “period”, “dot” or “comma” and “hyphen” for punctuation. Your iPhone will also “insert new line” and begin a “new paragraph” if you tell it to. Experiment with speed and volume to find the limits of your iPhone Voice Dictation, usually you can go pretty fast. Autocorrection can be used by tapping underlined words after you are done talking, tap word suggestions for a quick correction.
You can find a number of dictation commands for iPhone dictation and Siri here.
The required speaking volume depends on a number of factors, such as background noise and clarity of speech. Try to talk directly into the microphone at the bottom of your device. Dictation works best when connected to a fast WiFi network or 3G and above when going mobile. Apple needs to process your voice input to make sense of the audio data and convert it into text. Try to keep the voice recording under half a minute for the best reliability.
How to delete words when using iPhone dictation
You’ll probably make a mistake once in a while when using iPhone dictation and want to delete the last word or maybe even the entire last sentence. Unfortunately Apple still does not offer an easy way to delete a wrong word simply by voice command. Instead, there are a few workarounds you can use:
- One possibility is using the Shake to Undo feature, where you just have to shake your iPhone and it will mark the last sentence and delete it.
- If you want to replace a word because your iPhone misheard it, you can double-tap it, tap on the microphone symbol and say it again. This also works with whole sections that you might want to replace. Select what you want to replace and tap the microphone symbol and start speaking.
- If your iPhone isn’t sure if it heard a word correctly, a blue line will appear under the transcribed word. In order to correct it you can tap the underlined word and choose the right spelling.