iCloud Photo Library: How to Enable
 By enabling the iCloud Photo Library on your account, you can actually save storage space on your iPhone or iPad, while retaining access to all of your photos. Whether you like to dabble in mobile photography, shoot plenty of pictures of your kids or take a daily selfie, the iCloud Photo Library is something you should check out.
How to enable the iCloud Photo Library
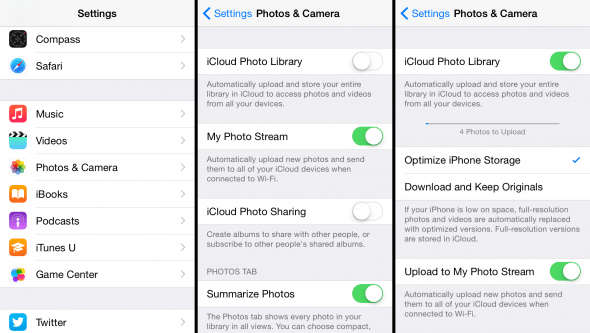
Settings → Photos & Camera → iCloud Photo LibraryYou can enable the iCloud Photo Library along or without your Photo Stream. On your iPhone or iPad, open up your “Settings” app, then go to “Photos & Camera” and finally toggle the “iCloud Photo Library” switch to active.
This will start the synchronization process and offer you two options to choose from. Either you optimize local storage and only retain viewing resolution images (recommended) on your phone, or you choose to keep the originals on the iPhone. The latter is really only useful if you are planning to print images directly from the phone, or plan to edit them in some high fidelity app. We recommend using the storage space optimizing feature, as it frees up quite a bit of space on your device.
The iCloud photo libary limits depend on your iCloud plan. If you are just using the free option you have 5 GB of space, the first upgrade would be 50 GB for 0,99 per month.
iCloud Photo Library vs. Photo Stream
The Photo Stream only stores the last 1000 pictures or 30 days of photography (whichever of the two yields greater numbers, will effectively apply) and syncs them across your devices. Photo Stream does not count towards your allotment for iCloud storage space, which is currently 5 GB for free usage and up to 2 TB for paid plans.
The iCloud Photo Library does count towards your iCloud storage allotment, but has no hard limits on how many pictures you can store in it. This is a huge advantage for users with extensive libraries. You can also access the iCloud Photo Library via your Mac by opening the “Photos” application.