How To Sync Your iPhone With iTunes Wirelessly With Wi-Fi
 Apple introduced the iTunes Wifi Sync feature a long time ago, yet still many people don’t know about the wireless sync feature on their iPhone. You don’t need to plug your iPhone into a USB port on your Mac or PC to synchronize it with iTunes. All that can be done through your wireless connection, even if your computer uses an ethernet cable. As long as both devices are on the same home network, you will be able to sync wirelessly. This is a tutorial on how to enable iTunes Wifi Sync, also known as “Sync iPhone over Wi-Fi” in the iTunes application.
Requirements for wireless iPhone sync
All you need is your iPhone, a Mac or PC, a wireless router and both of your devices should be connecting to the same router.This is the case in most modern households. Whether your computer connects wirelessly or through a wired connection doesn’t matter.
How to enable iTunes WiFi Sync
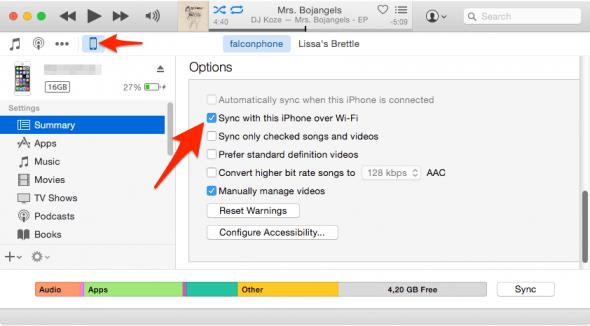
(Connect to USB) > iTunes > iPhone > Summary > Sync over Wi-FiConnect your iPhone via USB for one last time. iTunes should open up automatically on your computer, if not, then please launch it to continue. Select your device from the icon bar and place a checkmark in the “Sync with this iPhone over Wi-Fi” box, down in the “Options” area of the “Summary” screen.

You can now sync for one last time using the “Sync” button. After the sync has gone through, feel free to remove the USB Cable and enjoy wireless syncing of your backups, settings, apps and media content.
Force manual iPhone WiFi sync
Your iPhone and iTunes should stay in automatic, sporadic contact and conduct the Sync when appropriate. As soon as you plug your iPhone into a wall socket or other type of charger, it should seek contact to your computer and initiate a wireless sync.
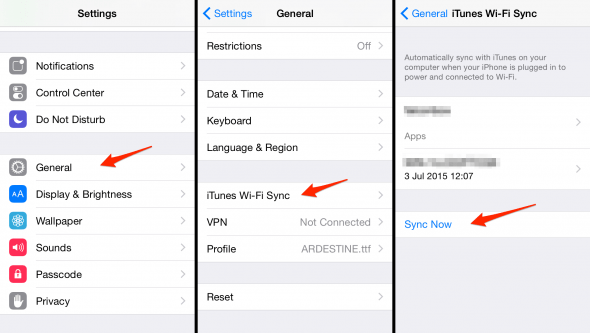
Settings > General > iTunes Wi-Fi Sync > Sync NowIf you want to force a WiFi sync from your iPhone, you may do that through the “Settings” app. Go to the “General” section and scroll down. Tap “iTunes Wi-Fi Sync” and finally “Sync Now”.
