How to Transfer Music to iPhone
![]() Transferring music from your Mac or PC to your iPhone should be a straightforward process, one might think. Apple is not only the inventor of the iPhone, but also coined the iconic iPod in 2001 after releasing the first version of iTunes for the Mac. Roughly fourteen years after the fact, we still need to have a tutorial on how to transfer music to iPhone, as the user interface principles behind this action are counter-intuitive to many people. But don’t worry, we will get you through this and guide you through the entire process of syncing music selectively or on a general basis.
Transferring music from your Mac or PC to your iPhone should be a straightforward process, one might think. Apple is not only the inventor of the iPhone, but also coined the iconic iPod in 2001 after releasing the first version of iTunes for the Mac. Roughly fourteen years after the fact, we still need to have a tutorial on how to transfer music to iPhone, as the user interface principles behind this action are counter-intuitive to many people. But don’t worry, we will get you through this and guide you through the entire process of syncing music selectively or on a general basis.
Using automatic sync to transfer music to iPhone
First of all, we will need to connect our iPhone via the regular USB cable to a Mac or PC, unless wireless sync has been enabled beforehand. Note that an iPhone can only be synced with one iTunes library at the time.
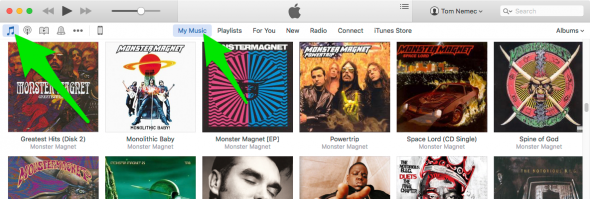
Open up iTunes if not already opened on the computer, then click the Music icon at the top left of the interface. Then click “My Music” to view your library. To add songs to your library, click the menu icon at the top left on Windows or select the Menu Bar on your Mac. Then go to File > Add to Library to add a song, folder or album to your media library. You can also add songs by dragging and dropping them into the iTunes application.

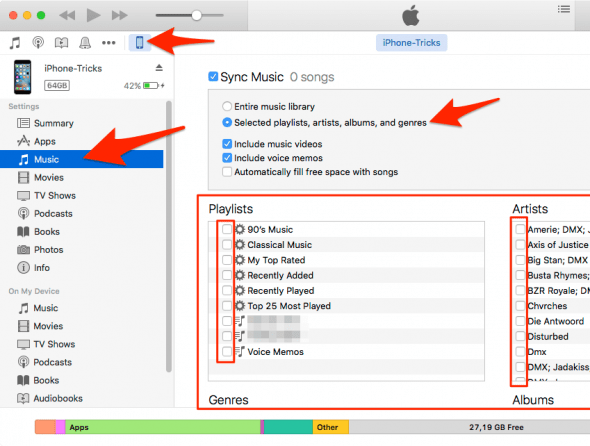
Next up, we will have to configure the sync settings to your liking. Click the little iPhone icon in the toolbar and select “Music” from the sidebar on the left.
Enable the “Sync Music” checkbox, then either choose to sync your “Entire music library” (only recommended if you own a very large device, such as the 128 GB models), or “Selected playlists, artists, albums and genres”. For the purpose of this tutorial, we will be going with the latter option to demonstrate the feature in detail.

Next, select either a Playlist, Artist, Album or Genre by checking the box next to any of the entries you would like to transfer to your iPhone. They will be synced automatically, even if you add additional media to the selected group at some point in time. This makes it easy to keep e.g. a playlist in sync on multiple devices. If you’re happy with your settings, hit the “Apply” button at the bottom right to save your syncing preferences.
Manually transferring songs and albums to iPhone
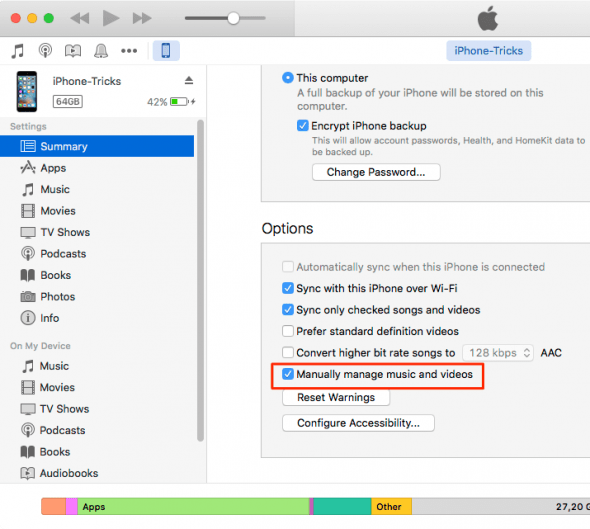
Another, very popular option is to manage your iPhone storage manually. This can be achieved by going to the little iPhone symbol in the iTunes toolbar, then selecting “Summary” from the sidebar on the left. Now scroll down a bit until you see the option titled “Manually manage music and videos”. Check it to enable manual song transfer.

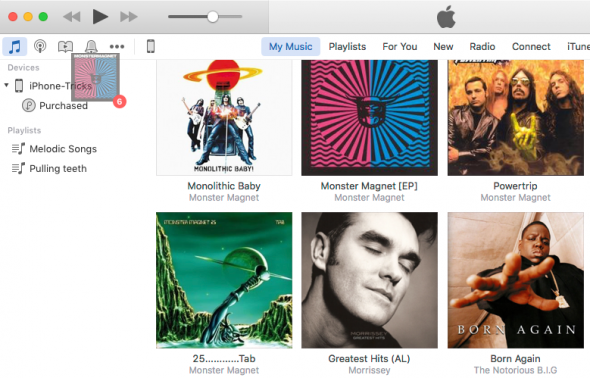
You can now visit your iTunes media library (“My Music”), then drag and drop any of your albums or individual and multiple song selections onto the device, which will be displayed in a dynamic sidebar to the left, which pops up whenever you drag any element in your personal library.
