Enable Two-Factor Authentication to Protect Your Apple ID
 This is a guide on how to enable two-factor authentication (2FA) and protect your Apple ID against theft and hackers. Enabling 2FA counts as good security practice, as it serves as an added layer of security for the most important parts of your Apple ID account. It practically impossible to steal data from your account without logging into it. Without two-factor authentication, attackers can simply steal your password on a phishing site or retrieve it from somewhere on your computer, or gain access by other means. With two-factor authentication enabled, the password acts as only one of two keys that are necessary for any potentially harmful action that could compromise the security of your data and lead to abuse of your stored payment information via illicit transactions.
Why you should protect your Apple ID
Your Apple ID serves as the central point of authentication and management for services such as the iTunes App Store, iCloud, iMessage, Apple Music and FaceTime. It also contains valuable access to your payment information, albeit not directly. An attacker with access to your Apple ID could purchase items on your behalf and it would be billed to your credit card and other payment methods that are stored in conjunction with your account.
How does two-factor authentication work?
Once two-factor authentication is enabled, logging into your Apple ID or resetting the password to your account will be protected by another layer of security. In detail, this means that:
- Managing your Apple ID and all accompanied details such as your address, email address, payment info and your security questions will require at least two of the following elements: Your password, a trusted device or your recovery key.
- Resetting your Apple ID password without your recovery key and a trusted device will be impossible. This means that storing your recovery key someplace safe is essential, otherwise you might be locked out of your account at some point.
How to enable two-factor authentication for your Apple ID: Guide
There are several ways to enable two-factor authentication for your account, we prefer to do it via the browser. Open up the following URL on your iPhone, Mac or PC:
https://appleid.apple.com/account/manage
Log into your Apple ID by providing your primary email address and your password. You should now reach a configuration page that allows you to manage different aspects of your Apple ID.
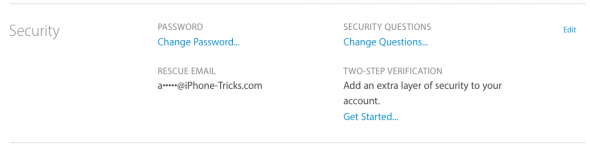
Tap or click “Get Started…” in the section titled “two-factor authentication”. This will launch the assistant.
Click “Next” and follow the instructions for every successive step.
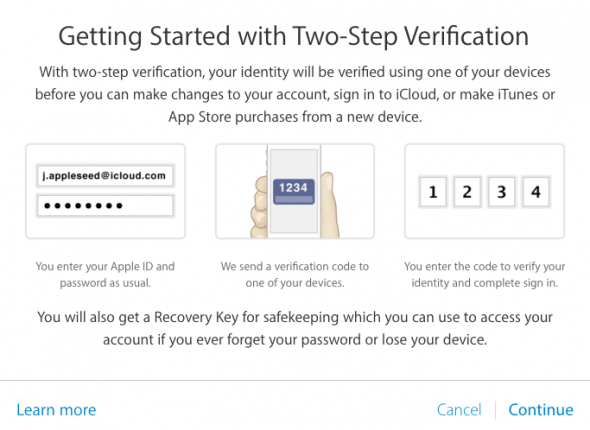
The setup process entails the following steps:
- Adding a trusted phone number, so that Apple can send you a 4-digit code to verify your identity in case you have no other trusted devices available. This number could be your own phone number, or the one of your partner or a family member. Make sure that the number can receive SMS messages.
- Verify the phone number by entering the verification code you have received in the text message from the last step. Click “Send a new code” if you did not receive anything after a couple of minutes.
- Set up your trusted devices, which you can use for two-factor authentication aside from the SMS approach. A trusted device is an iPhone, iPad or iPod touch with “Find my iPhone” enabled and is logged into your Apple ID. These will then receive a push notification containing the 4-digit code in the future, which is faster and more reliable in many cases.
- Remember to print or write down your recovery key in the second step, it is absolutely necessary that you retain access to this key in case anything goes wrong (such as a trusted device being lost or destroyed) or you want to reset your password.
- Enter your recovery key in the third step, which is required to verify that you have indeed stored the key for later access.
- You can now fully enable two-factor authentication and create app-specific passwords if needed, as third-party applications will now require their own password to access e.g. your iCloud email accounts and calendars.