How to Transfer Photos from iPhone to Mac
 Are you one of those people who send photos to themselves via email, just to have them on their computer? There are ways to import photos from iPhone to Mac that are far more preferable. This guide shows you several methods to import photos from iPhone to Mac that are fast, comfortable and reliable, sucha as using AirDrop, your Lightning cable, Image Capture or iCloud.
Contents
Use AirDrop
Activate AirDrop on both devices → Share icon → AirDrop → choose destinationThis is by far the user-friendliest and fastest method to transfer photos from iPhone to Mac and you do not need more than your iPhone and your Mac.
Just activate “AirDrop” on both devices and start sending images to and from your devices.
Open a photo in your Photos app on either device and tap/click the “Share” icon and tap/click “AirDrop”. Now make sure AirDrop is activated on the receiving device. Once it appears tap/click the destination and moments later it should appear. On your Mac photos sent from your iPhone will be saved under “Downloads”.
If you send images froma different iPhone, your Mac might ask you for approval to accept the image. Of course AirDrop also works to send images from your Mac to your iPhone almost the same way, the only difference is, that images are saved in your Camera Roll.
Use the “Photos” app on your Mac
Connect iPhone → Open Photos App → ImportThe most comfortable way of transferring photos to your Mac is of course the pre-installed “Photos” app. Connect your iPhone to your Mac using the regular USB cable. If it doesn’t open by itself, launch the “Photos” app via your Application folder or by typing “Photos” into Spotlight. Now click the “Import” tab to see the contents of your phone. This option is the preferred way of syncing images to a large database and offers face detection and many other helpful features.
All images that have been shot on your iPhone and are currently stored locally are visible here. Simply select the images you want and import them, or click “Import New” to grab all of them at once. The app will automatically determine whether an image is a duplicate or not and does a great job with respect to deduplication. They will appear in your Photo library on your Mac in the “Photos” tab without any further steps. That’s it!

Import photos using “Image Capture”
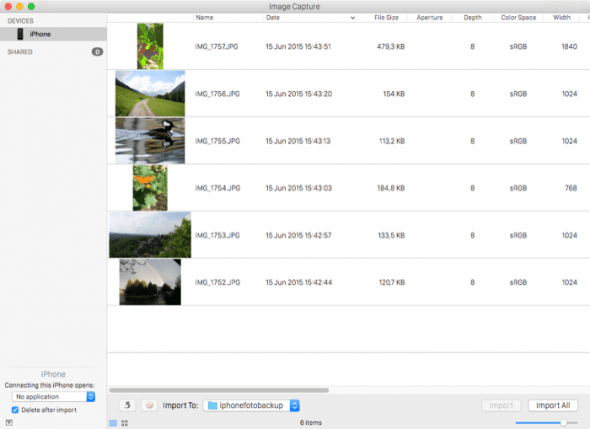
Spotlight → Image Capture → ImportAnother app that also works great with DSLR pictures and videos from an SD card (and gives you full control, as to where you want to store your files) is called Image Capture. It comes with your Mac and makes it easy to import photos from iPhone to Mac. It allows you to quickly import photos from your iPhone or camera to any folder on your hard drive. You can also define individual or multiple images to import, or import all new images.
Simply connect your iPhone, type “Image Capture” into your Spotlight Search (⌘ + Spacebar) and select the images you want using your mouse and the ⌘-key. Make sure to remember the output path, which you can choose by modifying the “Import To:” field. Then either click “Import” for your selection or “Import All” to grab all images. This method is very fast and allows you to freely choose the output path.
iCloud Photo Library: Zero-hassle imports
Settings → Photos → iCloud PhotosIf you prefer to leave the process of importing your images to automation, why not use the iCloud Photo Library? Your entire photo library is shared to Apple’s iCloud by enabling the corresponding toggle in the “Settings” app.
How to enable: Open the “Settings” app on your iPhone, go to “Photos” and finally enable “iCloud Photos” by activating the toggle button. After completing the initial sync, you’ll be able view your photos on any device that connects to the iCloud Photo Library, such as the “Photos” app on your Mac. Set and forget.

There are also other file-locker services and of course Dropbox, which you can use as a safe haven for your photos. Out of all of the cloud storage options, Dropbox and Google Drive are probably the easiest to configure. Check out the official website of Dropbox on this topic and install the client, which will then ask you to automatically import media as soon as you connect a supported device such as an iPhone.
Tipp: Did you know that you can also use iCloud to share photos?.