How to Lock Your iPhone with a Passcode
 Not using a passcode on your iPhone is a tremendously bad idea. You should protect your iPhone with a passcode when not in use. Otherwise, thieves and anyone who has physical access to your iPhone can access your data, including your contacts, e-mails and SMS or text messages. As your iPhone contains all of your personal data, photos and videos, you should protect it as such. This is a guide on how to lock your iPhone with a secure passcode and protect its contents from prying eyes.
Activate Passcode on iPhone
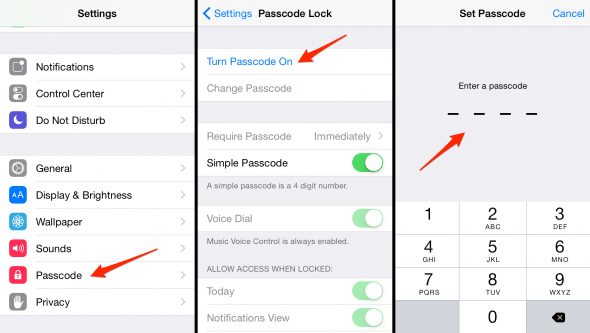
Settings → Touch ID & Passcode → Turn Passcode OnOpen up your “Settings” app and head to the “Passcode” section, then enable your passcode by tapping “Turn Passcode On”. Naturally, this button will only be available when you are not already using a passcode, we also have a guide on how to change an existing passcode on iPhone.
Your iPhone will now prompt you to enter a four-digit or six-digit numerical code. Confirm by re-entering the same code, then you’re done! This is now your new iPhone passcode.
This passcode doesn’t have to be forever. You can always change your iPhone passcode quite easily. Learn how to change your iPhone passcode here.

If you would rather prefer a more complex passcode along the lines of a secure password (recommended), you may disable the “Simple Passcode” toggle, which raises the requirements for the quality of your passcode. Thus raising the overall security of your device, as simple passcodes are relatively easily cracked using specialized equipment. You may also choose the grace period during which no passcode is required to unlock the device, or restrict certain items from being accessed while the device is locked.
Protect iPhone data with Erase Data feature
There is also an “Erase Data” option at the bottom of the list, which (if enabled) will erase all of your personal data on the phone, should someone try and brute-force his way to accessing your files. This will happen after 10 unsuccessful attempts.