How To Turn Off Or Change Auto-Lock on iPhone
 Whenever you are not using your iPhone for a while, the auto-lock on your iPhone (also known as the “iPhone Screen Timeout“) will turn on automatically and put the device into sleep mode. This way not only your data stays secure, battery life will be saved, too. However, sometimes you do not want this to happen. While cooking for instance you do not want to unlock your iPhone with greasy fingers every 3 minutes in order to read the recipe. Therefore you might either turn off “Auto-Lock” on your iPhone or increase the time period before your iPhone is put into sleep mode.
How to change “Auto-Lock” on iPhone
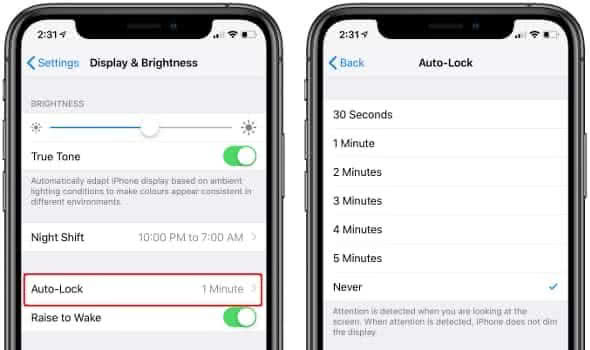
Settings → Display & Brightness → Auto-LockTo change or even turn off the “Auto-Lock” feature on your iPhone open up the “Settings” App and go to “Display & Brightness”. Then tap on “Auto-Lock”. Now you can either adjust the time period that has to run down until your iPhone turns on the sleep mode (30 seconds up to five minutes). Or deactivate the “Auto-Lock” completely by selecting “Never”.

Note that you can only change the settings if you are not in low power mode. If necessary, deactivate the feature by opening the “Settings” app and selecting Battery → Low Power Mode.
Tip: It is better to use the option “Never” only temporarily. If you forget to manually lock your iPhone, the battery will drain quickly. Hence, remember to change back the settings to one of the available time periods. In another article we show you the best tips to save battery on your iPhone