iOS Privacy Settings Guide
 Nobody wants people spying on their iPhone, since our smart devices carry some of our most sensitive information. We’re extremely pleased by Apple putting such a high emphasis on privacy and personal data protection with their clients. Here’s a guide on how to improve your privacy on the iPhone.
How to limit or disable location services
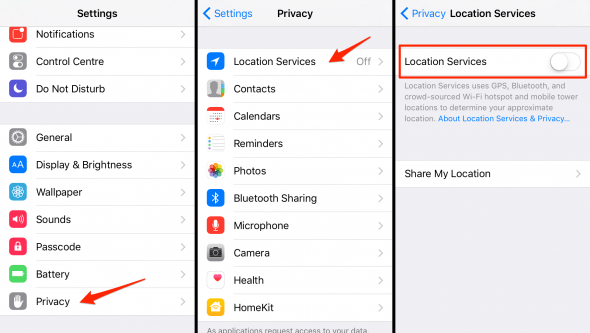
Settings > Privacy > Location ServicesLimiting or disabling the “Location Services” on your iPhone helps to keep the amount of metadata and data on your current GPS position low, while reducing battery drain.
You can switch them off or toggle app access on a case-by-case basis by going to your “Settings” app, then tapping “Privacy” and either managing the toggles for your apps from here (disabling a toggle will prohibit the respective app from accessing your position), or turning off the “Location Services” altogether. You will have to switch them on from time to time, when using a navigation app.
How to set DuckDuckGo as your default search engine
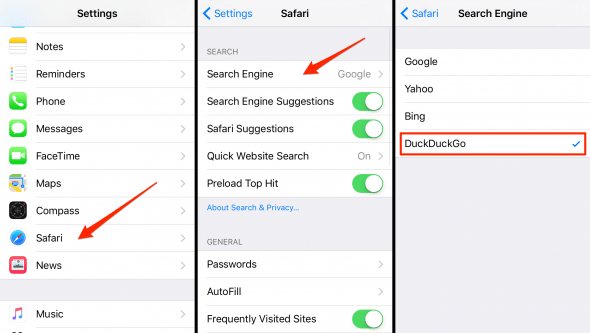
Settings > Safari > Search EngineGoogle tends to give you the best search results, but then again, they don’t provide their services as a charity. They’re a business. Ever wonder what the product is, when using a free service? Your data. To avoid being sold out to advertisers, try an anonymous search engine such as DuckDuckGo.
You can set DuckDuckGo to act as your default search engine on iPhone by going to your “Settings” app and tapping the “Safari” section, then selecting the “Search Engine” menu and finally making your choice. Don’t worry, you can always go back, should you be unhappy with the search results at any point.
How to limit app access to your personal information
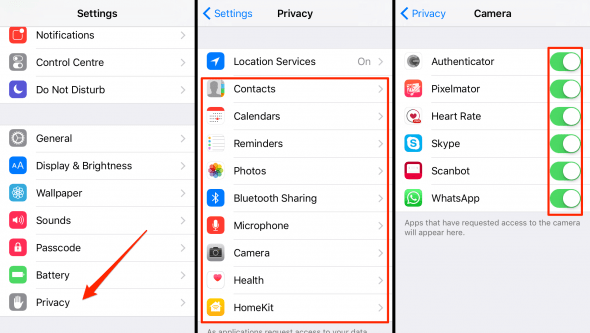
Settings > PrivacyGo to the “Privacy” section of your “Settings” app and pick one of the categories, such as e.g. “Camera”. From here, you can allow or disallow access to your iPhone’s camera to specific apps.
How to enable “Find my iPhone”
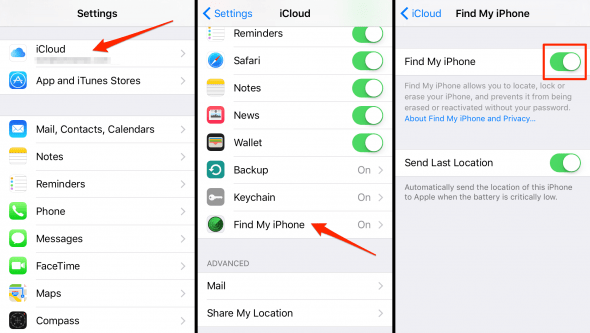
Settings > iCloud > Find my iPhoneIt’s always a good idea to keep this feature enabled, or to switch it on in case it’s been disabled. The “Find my iPhone” feature requires access to the “Location Services” we’ve written about before, but it is totally worth it. With the “Find my iPhone” feature enabled, you can locate a stolen device or even wipe it remotely to destroy any personal information, in case of a theft or when irretrievably misplaced. See this guide for more background on “Find my iPhone.”
Go to “Settings”, “iCloud” and finally “Find my iPhone” to check the status of this feature and enable it if needed.
How to “Limit Ad Tracking” on iPhone
Settings > Privacy > AdvertisingIf desirable, you can set your iPhone to send a “Do Not Track” request to websites and thus “Limit Ad Tracking” from the “Privacy” menu in your “Settings” app. Go to the “Advertising” section at the very bottom to make this adjustment.
What does it mean in detail? Well, the non-technical explanation is that advertisers will effectively (hopefully) collect less data on your browsing habits and thus not follow you around the web with so-called “retargeting” ads, which are tailored to your interests and can be quite embarrassing at times.
![]()
Bonus tip: Avoid having your App Store password cached
Now this is one for the truly paranoid, or for iPhone owners who leave their device unattended at the office or their place of study:
Avoid unauthorized purchases in the iTunes App Store by dismissing the prompt about storing your password for 15 minutes after making a purchase. While this setting is surely convenient, it serves to harden security to keep it turned off. Otherwise you’ll create a timeframe within which an attacker can use your active payment authorization to purchase apps, content and more using your Apple ID. By the way, did you know that iTunes store purchases are refundable for a limited period?