How to Use Do Not Disturb on your iPhone, iPad, or iPod touch
 Do Not Disturb is a great feature that comes with your iPhone and keeps notifications, calls, and other potential disturbances out of your way when you need to concentrate. Or perhaps you might want to take a nap or spend the night sleeping comfortably while your iPhone stays nice and quiet. This guide will show you how to set up Do Not Disturb on iPhone.
Once you enable “Do Not Disturb”, all and any notifications will be muted, but still arrive in your Notification Center. So no need to worry, your alerts and updates will be waiting for you once you return to your phone. This feature is extremely useful for presentations and meetings, too.
How to enable Do Not Disturb on iPhone
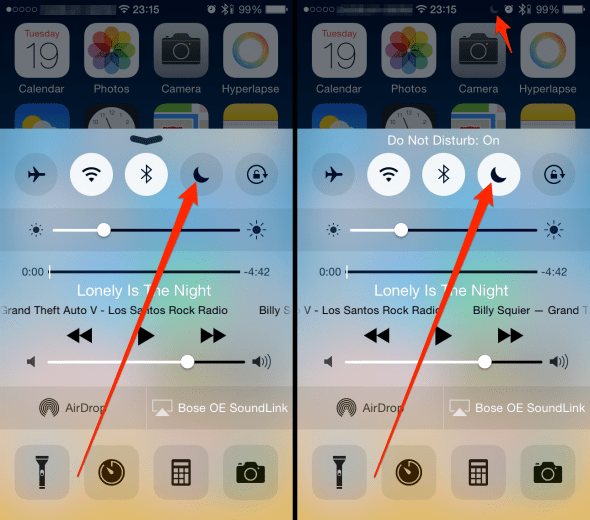
Swipe up → Tap moon-shaped Icon (“Do Not Disturb”)You can toggle “Do Not Disturb” mode at any time via the Control Center.
Swipe up from the bottom edge of your screen to access the toggles in iOS. Then tap the crescent moon shaped icon to activate DND. Once you turn it on, you’ll see a tiny indicator in your status bar that confirms you have activated it successfully. Also, note that you can use the small icon as a reminder to disable DND mode once you want to receive notifications again.

Scheduling Do Not Disturb on iPhone
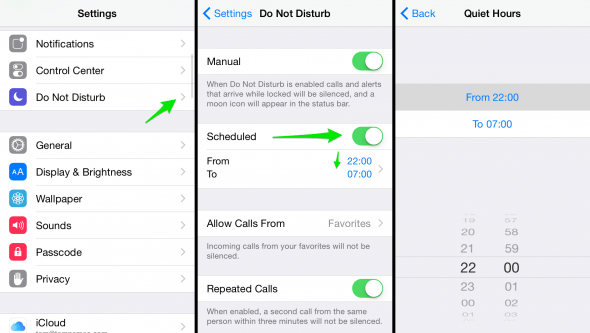
“Settings” → “Do not Disturb” → “Scheduled”If your quiet hours are pretty much fixed on both weekdays and weekends, you might want to configure the following feature: Scheduled quiet hours for your iPhone. Once set, this will enable and disable the “Do Not Disturb” mode at set times.
Open up your “Settings” app, look for “Do Not Disturb” and within this settings panel enable the “Scheduled” toggle. The default settings are 10 PM to 7 AM. You may tap those too, in order to customize them even further. Unfortunately, there is no way to schedule weekdays and weekdays separately. Apple might change this in a future version of iOS. Until then, we may pick a schedule that fits most of the week and use the manual toggle method above as needed.
To disable the scheduled planning of your “Do Not Disturb” feature, simply deactivate the corresponding toggle on the settings page.

Do Not Disturb exceptions and emergencies
While the goal of enabling Do Not Disturb mode on iPhone is undoubtedly the avoidance of distractions and such, we might want to make an exception for certain people or situations. Your family might be in need of help, a medical emergency might occur, or your boss is trying to reach you for an important reason. Luckily, Apple thought of these scenarios and included two extra options for this purpose. Read more about how to enable the Emergency Bypass for Do Not Disturb mode.