Backup iPhone, iPad, iPod Touch to iCloud (or Restore)
![]() Backing up and restoring your iOS device is necessary from time to time and saves your data regularly. Fortunately, Apple made it easy and we’ll tell you how to back up iPhone or restore an iPhone using iTunes or iCloud in the following guide. First of all, a few words regarding backups and what they include or exclude. And why everyone should make use of backups for data safety purposes.
Backing up and restoring your iOS device is necessary from time to time and saves your data regularly. Fortunately, Apple made it easy and we’ll tell you how to back up iPhone or restore an iPhone using iTunes or iCloud in the following guide. First of all, a few words regarding backups and what they include or exclude. And why everyone should make use of backups for data safety purposes.
Contents
Why should I backup my iPhone?
Once you lose your iPhone via theft, an accident or simple forgetfulness, you’ll be glad about the fact that you are in posession of a backup. Both iTunes and iCloud backup contacts and all their numbers, adresses and details – independently of your settings. This way all your iPhone data is saved in a backup and you can easily restore your iPhone with a backup. Setting up a new iPhone with this data is straightforward and brings you right back up to speed. Since the advent of iCloud, your contacts, calendars, notes and (if chosen) photos are stored in the Apple iCloud and don’t need to be backed up specifically. These are linked to your Apple ID and will be accessible as soon as you’re logged in on the device in question.
Benefits of an iPhone backup
The nice thing about both iTunes and iCloud backups is that Apple will make sure that any purchased and installed content in the form of apps or music will reappear on your device, as well as your personal settings and preferences including WiFi passwords and health data (in the case of an encrypted backup). Backups include nearly all data and settings, apart from files you stored in third-party cloud services such as Gmail and Apple Pay or Touch ID Settings. Your fingerprint never leaves the device, which is why you will need to reconfigure it after restoring.

Backup iPhone to iCloud
Settings → Apple ID, iCloud, iTunes & App Store → iCloud → iCloud Backup → activateBacking up your iPhone to iCloud is free for up to 5 GB of data. You can upgrade the storage for up to 1 TB (TeraByte) of storage volume if you subscribe to a plan. All backups stored within the Apple iCloud are encrypted and can be restored from pretty much anywhere with an internet connection. This option is highly recommended, as you can access your backups even if you lose your iPhone or Mac/PC.
To create an iCloud backup with your iPhone, connect to a WiFi network. Open up your “Settings” application and select “Apple ID, iCloud, iTunes & App Store”, then “iCloud” and “iCloud Backup”. Now activate your “iCloud backup” to go through with the backup procedure for this device. The status line at the bottom of the screen tells you the date and time of your last backup. Once you turn on the iCloud Backup feature, your device will try to perform regular backups on a daily basis.
Restore iPhone from iCloud
If you reset your iPhone via the settings or upgrade iOS using the clean install method via iTunes, you’ll be greeted by the iOS Setup Assistant. One of the steps includes a question about whether to restore the device from an iCloud backup, which should list the previously created backup.

Backup iPhone using iTunes/ USB
Step 1: File → Devices → Transfer Purchases Step 2: File → Devices → Back UpShould you prefer locally stored backups, which can be advantageous when using a large device with plenty of apps and content, iTunes is the way to go. Your USB connection (or WiFi, optional) can be used to transmit the data rather quickly, the backup files themselves will be stored in a special folder on your Mac or PC.
To backup iPhone using iTunes, simply start the program on your computer and connect the device via the preferred method, e.g. using the USB cable. Now select “File” and “Devices” and afterwards “Transfer Purchases” to copy any purchased or downloaded content that is present on your device but not on the computer. This step is absolutely necessary to ensure a complete backup. After iTunes has finished this task, simply go to “File” and “Devices” and now click on “Back Up” and patiently await the completion of your backup. Listing and managing locally stored backups is possible by going to “Preferences” and “Devices” in iTunes.
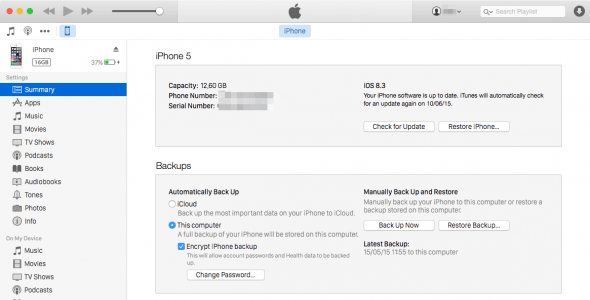
Restore iPhone from iTunes backup
To restore your iPhone from one of your iTunes backups created via the method above, connect your device via the USB cable and open the iTunes application if not already running. Then navigate to your iPhone’s detail page and select “Restore iPhone…”. Pick one of your backups, usually the latest date will be preferable. After a couple of minutes, your iOS will feel shiny, fast and new while having retained your settings. Enjoy!
Other Backup Options
If you do not want to use iCloud or iTunes you can use other backup services, but be aware these cannot offer exactly the same advantages like iCloud and iTunes can. On e option would be an iPhone backup with Dropbox and another option is an iPhone backup with GoogleDrive.