How To Get Live Photos As Your Apple Watch Face
 Here’s a tutorial on how to add your very own Live Photo Face to an Apple Watch. Owners of the Apple Watch can now use Live Photos to spice up their watch faces. When lifting the Apple Watch to check the current time or your notifications, the Live Photo will put its animated awesomeness on display.
Requirements
To get the most out of this guide, you should of course own an Apple Watch as well as an iPhone. If you happen to own an iPhone 6s or later, you can create Live Photos yourself. Owners of older iPhones will have to ask their friends to send them one, or acquire Live Photos through third-party apps.
What is a Live Photo
Live Photos are images that have been brought to life by Apple’s invention, available to users of the iPhone 6s or later. With a nifty trick even users of older iPhone models can use Live Photos. A Live Photo contains one and a half seconds of video, which takes place both before and after the actual shot.
Hint: Certain apps unlock Live Photos on older devices without the need for jailbreaking!
Using Live Photos as Watch Faces
One way to get a Live Photo onto your Apple Watch for use as a Face is to favorite the picture in question. By default, the Favorites album in the Photos app on the iPhone is synced to your Watch. We will be taking a different route to preserve storage space and keep things neat and tidy. For this purpose, we’ll create a special folder to house our Watch Faces in.
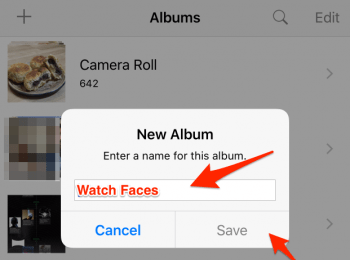
Creating an Apple Watch Face Album
Open up your Photos app on the iPhone and tap the Albums tab. Then tap the plus sign on the top left to create a new album. Name it “Watch Faces” or give it another descriptive name to your liking, then tap Save.
Live Photo Watch Face Downloads
If you lack a proper collection of interesting Live Photos, we suggest downloading one of the popular apps that curate animated wallpapers and allow you to save them to your Photos app. One such app is “Watch Faces – Live Photos, Wallpapers and Backgrounds” which you can get for $1.99 with a searchable interface and editing features.

Syncing Live Photo Watch Faces with Apple Watch
After creating or downloading Live Photos via your preferred method, select them in your Photos app by tapping Select at the top right, then tapping the thumbnails of the respective photos. Finally, tap the Share button in the lower left corner. Select Add to Album in the list and choose your newly created album.
Next, open up your Watch app on the iPhone and scroll down on the first screen. Tap Photos and select your Watch Faces album as the one to be synced to your Apple Watch. After a short while, all of your images will be transferred to the internal storage of the Watch. Unfortunately, there is no way to check the progress as of yet.

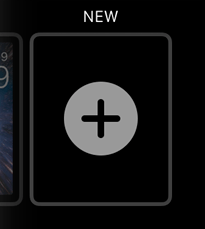
Enabling Live Photo Watch Faces
Firmly press your current Watch Face on the Apple Watch (also known as a “Force Touch”), which brings you to an overview of available Watch Faces. Then scroll all the way to the right until you see New, tap the plus sign to create a new Face.
Either swipe or use the Digital Crown to select the category Photos. Now tap on a Live Photo to select it as your Watch Face. From now on a Live Photo is displayed every time you look at your Apple Watch. If you have multiple Live Photos in the album, they will be displayed alternately each time the Apple Watch screen is activated.

Next, firmly press the “Photo” Face and select Customise by tapping the button below the preview. Now you can adjust the position of the time and complications – such as e.g. date or battery status – displayed on the Apple Watch screen.

Congratulations, you have now successfully created and applied your very own Live Photo Watch Face for Apple Watch!

Tip: If your Apple Watch doesn’t connect properly, try one of the solutions from our Troubleshooting article.
