How To Delete “Other” From iPhone
 If you open up iTunes, or your usage overview on your iPhone, you might notice that “Other” data takes up part of the space. In this tutorial we show you how to delete “Other” from iPhone. There is an easy way to get rid of all the excess data that accumulates over time and takes up space on the device.
Contents
What is “Other” in iPhone storage?
You may have noticed “Other” in the graphic for storage usage on your iPhone as well (go to: Settings → General → iPhone Storage). Until now Apple did not reveal what this means. Many iPhone users are insecure about the often very memory-intensive item and want to know what lies behind it. Anyway, it has nothing to do with “Other” files that you see in iTunes.
What you may notice: The smaller the internal memory of the iPhone is, the larger is the item “Other” in the diagram shown on the “iPhone Storage” page. In fact, the iOS operating system installed on your device is hidden behind the label. In addition, according to Apple, system files, software updates, Siri voices, cached files, logs and more are to be found under “Other”.
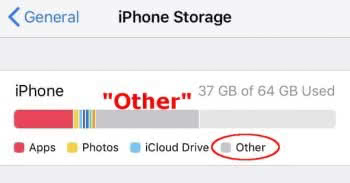
For example, the “Other” files on an iPhone with 16 GB take up about a third of the available storage space. Just scroll down on the “iPhone Storage” page to see how much memory your operating system is using. On an iPhone X with 256 GB, on the other hand, the occupied memory in the bar display at least optically hardly matters any more.
How to delete “Other” in iPhone Storage
If you want to delete “Other” on the iPhone, we have to disappoint you, because your operating system requires this space. So it’s not possible to remove the “Other” item and free up iPhone storage space. Nevertheless, some iPhone users report in relevant forums that it is possible to reduce “Other”. You can do this by backing up your iPhone (via iTunes or iCloud) and then restoring it to the device. We can’t confirm this “trick”, but it’s worth trying, e.g. if the item keeps growing for inexplicable reasons.
What is “Other” in iTunes?
If you connect your iPhone to a PC or Mac running iTunes, you’ll see an overview of the different types of data stored on the device and how much space each is taking up. Usually “Other” takes up quite a chunk of the total sum. Of course you don’t want to keep any clutter, especially if there is no real way to identify where it comes from. A lot of the stuff taking up space on your iPhone can be managed however, see our guide on how to manage iPhone storage.

In contrast to Googles Android, Apple prefers to forego technical details for reasons of simplicity. Don’t worry, we have an explanation handy. The definition of the mysterious “Other” data on your iPhone can be described as follows:
- Cached and buffered media content from all sorts of apps
- Safari browsing history and cached data
- Files stored within the mail application, e.g. attachments
- iTunes data for streaming and media playback, podcasts and such
- and all kinds of orphaned files and cached data for faster performance on your iPhone
These files make certain processes on your iPhone run faster. However, if the file size is several gigabytes, it makes sense to set these other files to zero and free up storage space.
How to remove “Other” from iPhone
Connect iPhone to PC/Mac > open iTunes > iPhone symbol > Backup Up Now > Restore BackupYou lose no functionality by getting rid of the “Other” storage, but rather gain a little bit of space for active usage. The most effective way to clean the “Other Storage” group of files is to back up and restore your device via iTunes. This will allow you to start with a semi-clean slate, but keep your personal data. This is how to go about it:
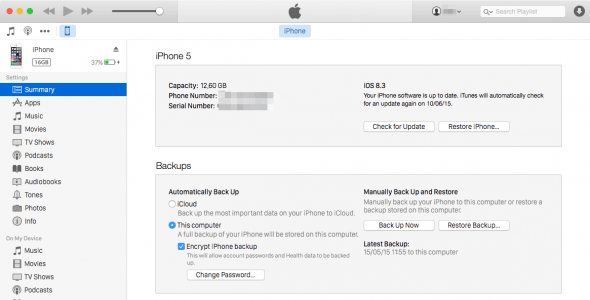
Connect your iPhone to a Mac or PC running the latest iTunes version and click on the iPhone symbol in the upper left corner. Then select “Back Up Now” in the Backup section to create a local, current backup of all your settings and personal data.
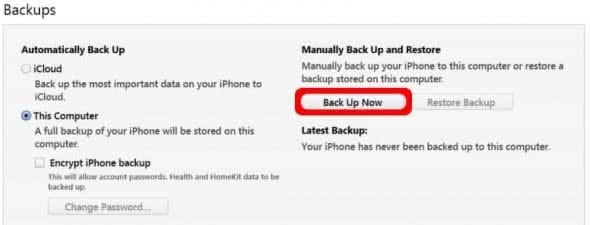
You might receive a warning about non-synched purchases. Go to “File > Devices > Transfer Purchases from iPhone” to authorize the current machine and sync all of your bought apps. This will enable a more seamless restore process afterwards. If you need more information on this matter see our full guide for restoring and creating iPhone backups.
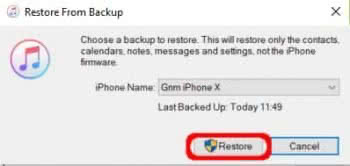
Once the backup is done, you can go ahead and click on the “Restore iPhone” button in iTunes. You will be prompted to temporarily turn off “Find My iPhone” before your iPhone can be restored. To do this, go to Settings → your Profile → iCloud → Find My iPhone.
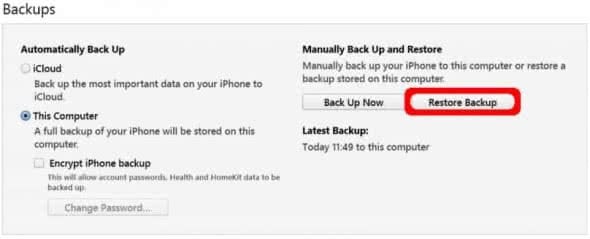
Make sure that you have selected the backup you just created (to the right of “Last Backed Up” there must be “Today” followed by a current time). Don’t worry, the “Other Storage” data is now gone and will not be re-synced to the device. Once the recovery is complete, the yellow bar for “Other” files in iTunes should be significantly smaller. Especially smaller devices with 16 GB of storage benefit from this method, as it often helps to reclaim multiple Gigabytes of storage space. This way thers’s more room for music, photos, apps and games on your iPhone!
iPhone storage full?
If you don’t have enough memory on your iPhone or if you don’t feel like cleaning up your iPhone storage again and again to free up space, you can also use an iPhone memory stick. These are available for all iPhone models with memory sizes up to 128 GB, such as RAVPower’s USB Flash Drive.
Check out RAVPower’s Flash Drive on Amazon
Tipp: In another article we show you how to expand iPhone storage space!