Change DNS Settings & Speed Up Safari
 This is a tutorial on how to change your DNS settings and speed up Safari on the iPhone. By swapping out the automatically configured DNS servers in your iPhone’s settings, we can actually speed up the Safari browser and all apps that are accessing the internet through your Wi-Fi connection. To improve Internet performance on iPhone you just need to add a DNS service by Cloudflare or Google. We explain how to change DNS on iPhone to speed up Safari and increase internet speed on iPhone.
Contents
What is a DNS Server and what does a DNS server do?
DNS is short for Domain Name System and a DNS server connects URLs with the correct IP addresses and vice versa. Many Internet Service Providers (ISPs), like Verizon or AT&T, lack proper and fast name resolution services and employ their own servers. A DNS server’s purpose is to resolve domain names to numeric IP addresses to be understood by your network stack. Don’t worry, we won’t get too technical on you, but it is advantageous to understand that DNS servers can be fast or slow and that this will impact your web browsing experience. Therefore depending on the DNS server you can improve your Safari speed. Just change your DNS server on iPhone and you’ll browse faster.
How to change DNS settings on iPhone
Settings → Wi-Fi → tap blue Info “i” → Configure DNS → Manual → Add Server → type 8.8.8.8 → alter order of DNS serversChanging your DNS server settings can be done on the settings page of your current Wi-Fi network. Open up the “Settings” and select “Wi-Fi”. Tap the blue “i” symbol next to your currently connected Wi-Fi network, which would be the one with a checkmark. This will take you to the detailed settings.
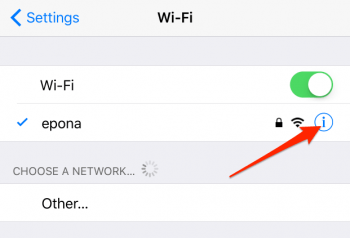
Hint: DNS settings can only be changed for Wi-Fi connections, not for the cellular/mobile data!
The detail page of your current Wi-Fi network should display your IP address, subnet mask, router and once you scroll down you should see “Configure DNS” under the heading “DNS” and next to “Configure DNS” it probably says “Automatic”.
Configure DNS settings
Tap “Configure DNS” to customize the content of this field. On the next page you should see the options “Automatic” and “Manual” and numerical values in the “DNS Server” section.
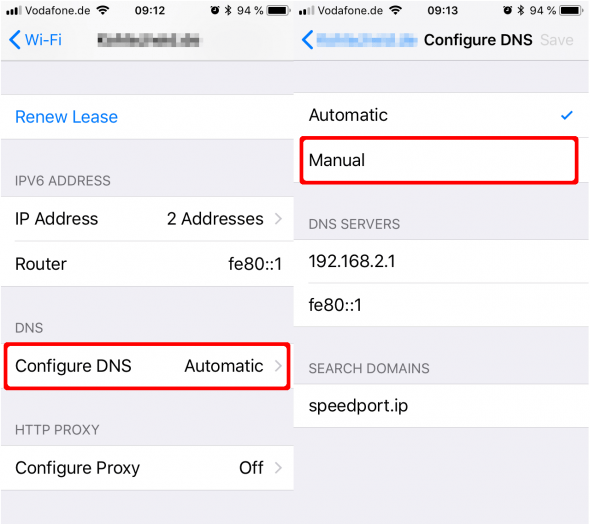
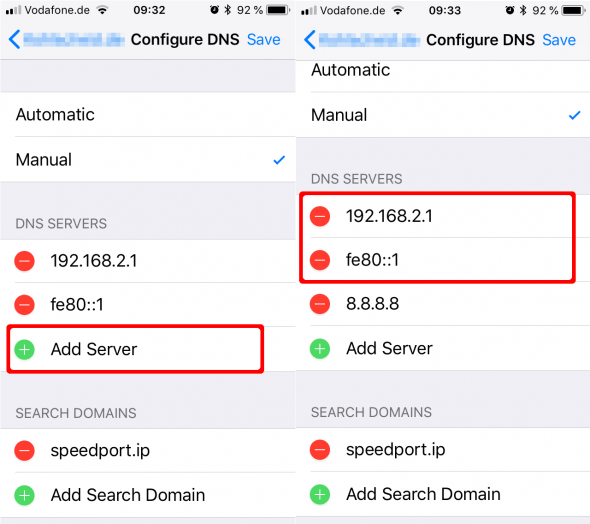
Tap “Manual” to alter the DNS settings on iPhone. Now tap “Add Server” and enter either the Cloudflare DNS 1.1.1.1 or the Google DNS 8.8.8.8, some say Cloudflare is even faster than the Google DNS server in DNS 1.1.1.1 reviews.
We can recommend the following servers for maximum speed:
- Cloudflare: 1.1.1.1
- Google DNS: 8.8.8.8
- Google DNS: 8.8.4.4
How to customize iPhone DNS settings
Before you just delete the other DNS servers note that once you delete your Home Wi-Fi DNS settings, your iPhone will no longer recognize your home Wi-Fi network.
So the best way to go about it is to first take a screenshot or copy the original settings down. Now delete the older settings, add the new DNS server and re-enter the old DNS settings underneath. This way you just alter the order of your DNS servers without deleting any. After you changed the DNS settings on iPhone, your original iPhone DNS settings will now act as a backup as soon as the Google DNS or Cloudflare DNS servers are not performing correctly.
This way you can also enter more than one new DNS server and this will optimize reliability and performance of your DNS settings on iPhone.
If you feel like not only your iPhone’s internet performance has gone down, more like your entire iPhone performs slowly you might want to clean up your iPhone storage or if this does not work check for spyware on iPhone.