iPhone WiFi Not Working? Here’s How To Fix WiFi Problems!
 Your iPhone does not connect to WiFi or the connection is slower than usual? Everybody is experiencing WiFi problems on the iPhone from time to time. In this article we show you a couple of solutions that will fix most of the typical WiFi problems.
Contents
- 1 Switch WiFi off and on
- 2 Restart iPhone
- 3 Update to the latest iOS version
- 4 Disable “Wi-Fi Networking”
- 5 Forget and reselect network
- 6 Reset Network Settings
- 7 Change DNS provider
- 8 Switch off Wi-Fi and Mobile Data
- 9 Renew lease
- 10 Switch Wi-Fi Assist on and off
- 11 Fixing WiFi problems with the iPhone 4s
- 12 Restore and set up iPhone
Switch WiFi off and on
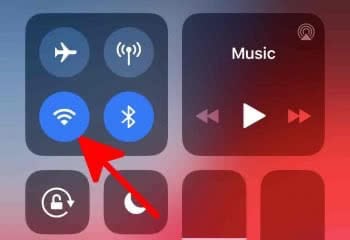
Control Centre → Wi-Fi ButtonBefore you start looking for the cause, you should simply deactivate WiFi and enable it again immediately. Occasionally WiFi problems are already solved through this little trick. Swipe from bottom to top or from the upper right corner to the bottom of the screen (iPhone X or newer) to open the “Control Centre”. Then tap the WiFi button to deactivate WiFi. Tap on the button again to turn it back on.
Restart iPhone
You can also try to solve the WiFi problem by simply restarting your iPhone. Press and hold the on/off button of your iPhone until the “slide to power off” appears and switch off your iPhone (up to iPhone 8). Depending on your iPhone model you will find the power button either on the right top or on the right side of the device. If you own an iPhone X or newer, press and hold the side button and one of the volume buttons to shut down the iPhone. Then press the on/off or side button until you see the Apple logo.
Tip: In another article we show you how to perform a hard reset depending on the iPhone model you have!
Update to the latest iOS version
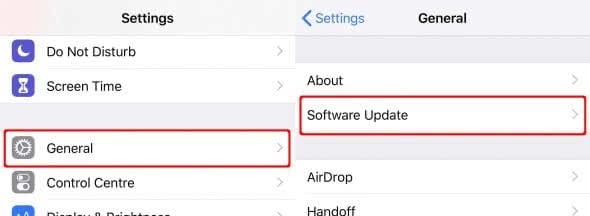
Settings → General → Software UpdateUpgrading to the latest system software is always a good way to solve any kind of problems on your iPhone. A look back shows that some versions of Apples mobile operating system suffered from WiFi issues that could be fixed by later updates. If you use a buggy version of iOS, you should definitely update it as soon as possible.
To do this, open “Settings” and tap on “General”. After that click on “Software Updates” to check for any available updates. If there’s an update available, you can install it directly without connecting your iPhone to your computer. Otherwise, you’ll simply be informed that your software is already up to date. By the way, you can also install the update automatically overnight.
Disable “Wi-Fi Networking”
Settings → Privacy → Location Services → System Services → Wi-Fi NetworkingIf the aforementioned tips don’t fix your problems, you might want to give this one a try. Deactivating a specific part of Apple’s so-called “Location Services” will improve the reliability of WiFi connections for some users. This specific option actually does nothing to affect your capability to use your location within apps and services, but helps Apple in building a database of open access router locations across the globe to provide better location services to users without cell access. Switching it off is therefore of no actual disadvantage to you personally and worth a try.
First open the “Settings” app. Tap the “Privacy” section in the menu and select “Location Services”. Now scroll down all the way to “System Services” and deactivate the toggle labeled “Wi-Fi Networking” at the end of the list. This might improve your WiFi connection reliability, as some users report.

Forget and reselect network
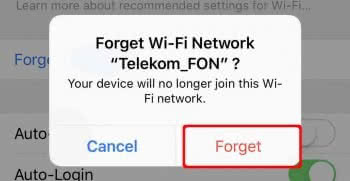
Settings → Wi-Fi → [your network name] (i) → Forget This NetworkIf you are unable to connect to a wireless network and you are told that you have entered an incorrect password – despite entering a correct password – you have the option of forgetting the network and then reselect it.
To do this, first go to the “Settings” app and select “Wi-Fi”. Then tap the respective network in the list and choose “Forget This Network”. A small pop-up will appear asking if you really want to forget the network. Then tap on “Forget”.
Now go back to the “Settings”-app, tap “Wi-Fi” and reselect the forgotten network. Then enter your password and see if it helped.
Tip: Did you know that you can share a WiFi password from iPhone to iPhone quick and easy?
Reset Network Settings
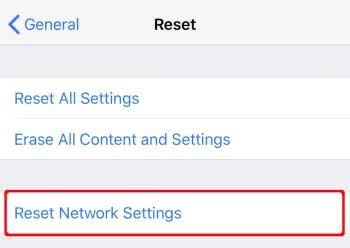
Settings → General → Reset → Reset Network SettingsThis solution requires you to know all of your WiFi passwords, so make sure to keep them at hand before you go ahead and try it. Resetting the iOS network settings gives you a blank slate with regard to everything network-related. After commencing the reset, you will have to re-enter your WiFi password or passwords. Users have reported improvements in battery life and connection reliability after trying this trick.
Go ahead and open up your “Settings” app. Tap “General” to access the general overview of settings. Scroll down and select “Reset”, finally tap “Reset Network Settings”.
Remember: You will require your WiFi password after applying this fix.
Change DNS provider
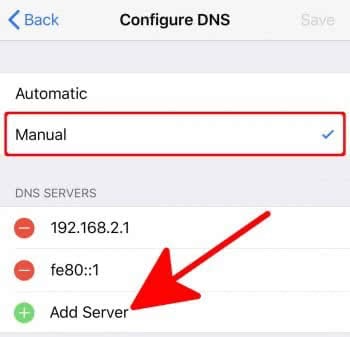
Settings → Wi-Fi → [your network name] (i) → Configure DNS → Manual → Add ServerTrying a different provider for your DNS (Domain Name System) can yield quicker loading times for web activities such as browsing or watching YouTube. By default, your iPhone will use the DNS Servers provided by your internet service provider. However, users are free to customize this setting and specify their own choice of DNS servers to circumvent issues or improve performance.
Open your “Settings” app and select “Wi-Fi” to get to the list of your wireless networks. Tap the blue “i”-in-a-circle symbol next to the name of your currently active connection. Then select “Configure DNS” at the very bottom of the screen and choose “Manual”. After that tap on “Add Server” further down. Let’s try the free and publicly available Google service.
Enter “8.8.8.8, 8.8.4.4” to set your primary and secondary DNS server to Google DNS.
An alternative to Google’s offerings would be OpenDNS, use “208.67.222.222, 208.67.222.220” instead, should you prefer OpenDNS. Usually Google is the fastest and most reliable DNS provider for all sorts of locations across the globe.
To revert back to the automatic, default setting, simply clear the field of any user input and your iPhone will pick up whatever settings your ISP recommends.
Switch off Wi-Fi and Mobile Data
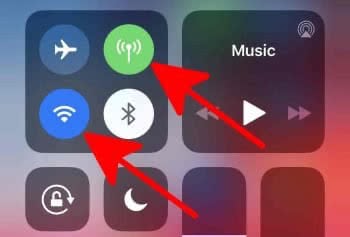
In rare cases, it may be necessary to temporarily deactivate both WiFi and mobile data. This is the best way to do this: Open the Control Center by swiping the screen from bottom to top (up to iPhone 8) or by swiping the screen from top right to bottom (iPhone X or newer). Then deactivate Wi-Fi as well as mobile data by tapping on the corresponding icons at the top left. After that switch Wi-Fi on again, followed by mobile data.
Renew lease
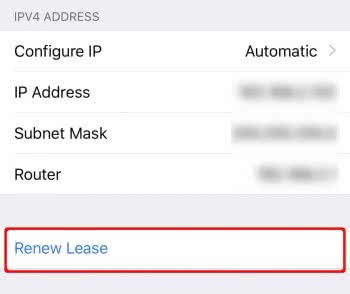
If you have problems with your WiFi connection, it is helpful to have a new IP address assigned to you. To do this, go to the “Settings” app and tap “Wi-Fi”. Then click on your current WiFi connection at the top and select “Renew Lease”. You may have to confirm the instruction again. You will then be assigned a new IP address and your WiFi will hopefully work fine again.
Switch Wi-Fi Assist on and off
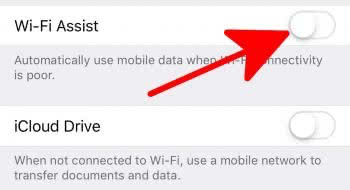
Settings → Mobile Data → Wi-Fi AssistApples Wi-Fi Assist feature ensures that mobile data is used when the WiFi connection is weak, so that your Internet connection remains stable. Due to the resulting costs it’s not a popular feature among users. If you still use it, you can try turning it off and on again to fix your WiFi problems. To do this, go to the “Settings” app, tap on “Mobile Data” and scroll down to the very bottom. Then tap the button to the right of “Wi-Fi Assist” to deactivate and reactivate the feature.
Fixing WiFi problems with the iPhone 4s
Especially if the WiFi symbol on the iPhone 4s is grayed out and no WiFi connection can be established, you should try all the tips mentioned.
Restore and set up iPhone
If none of the above tips help, you’ll have to restore your iPhone and set it up as a new device. This is the only way to get rid of any problematic settings on your iPhone.
Tip: Want to learn more about WiFi on your iPhone? In another article we show you how to boost and improve your iPhone signal.