How to Speed Up Your iPhone When It Starts Slowing Down
 It used to be more of an Android issue, but these days you can hear it more and more frequently: “Why is my iPhone so slow?”, users ask. Apps might take a lot of time to open up or load, the iOS interface begins to stutter for no apparent reason, overall your iPhone feels sluggish. Why do you have a slow running iPhone? Here are our top 10 common iPhone performance issues and performance fixes for iPhone that will speed up your iPhone and make it feel as good as new. No need to swap out your device for a new one.
Contents
Note: When your iPhone is very slow, we recommend updating to the latest version of iOS before attempting any of the following tricks. It makes sense to keep your iPhone up-to-date, both for security and performance reasons.
Manage your iPhone Storage
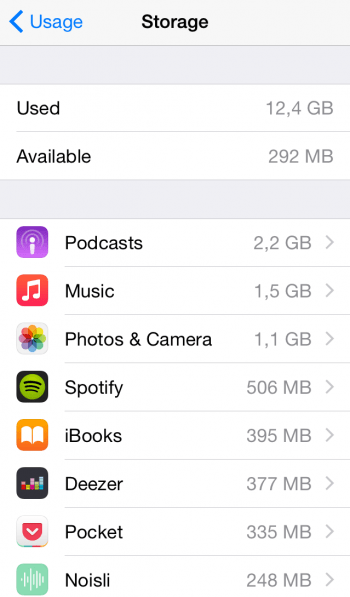
Settings → General → Storage & iCloud Usage → Manage StorageA full iPhone is a slow iPhone, thus we recommend to manage your iPhone storage and keep some of it available for the system to use. Otherwise your iPhone will run very slowly. To free up storage space on iPhone and gain some perspective on your current usage status, to go your “Settings” app. Tap “General”, then “Storage & iCloud Usage” and finally “Manage Storage”. Check if you can get rid of some of the heavier apps, then delete them accordingly. More on managing iPhone storage…
Delete messages
Messages → Swipe left on a messageEspecially message threads that contain a lot of attachments such as photos and videos can be problematic with regards to your device’s internal storage. Too much clutter and you will risk running into performance issues. To clear some of your history, simply open up your “Messages” app and swipe left on a contact’s message thread, then tap “Delete”.

Tip: In another article we show you how to delete text messages from your iPhone.
Clear Safari Cache
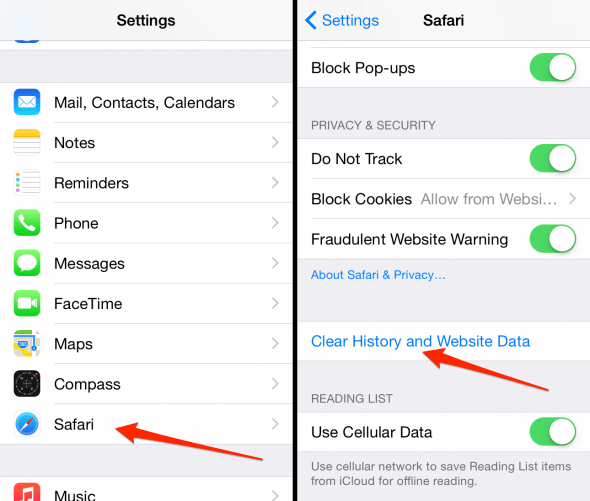
Settings → Safari → Clear History and Website DataClearing your Safari cache can resolve numerous issues with websites and browser performance. To clear your cache, go to your “Settings” app, select “Safari” and choose “Clear History and Website Data” to proceed. Note that you will have to log back into any user accounts on the web after performing this step, so keep your logins handy.
Disable Automatic Downloads and Background App Refresh
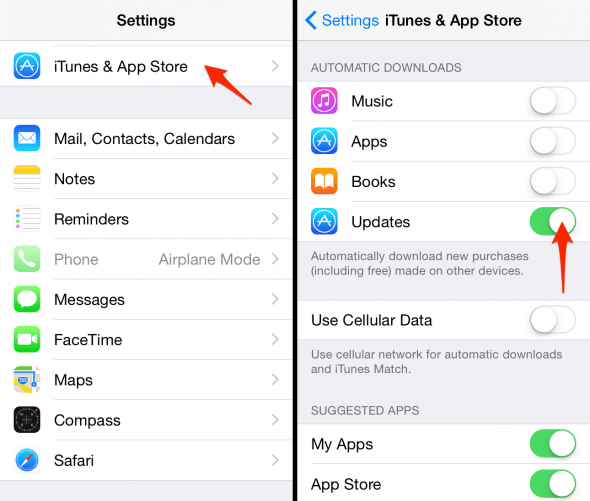
Settings → iTunes and App Store → disable “Updates” toggleBackground activity takes up some of your processing power in iOS. If you disable certain features, you might free up resources and thus enjoy a more smoothly running iPhone. We will begin by disabling automatic downloads for certain types of content, or all, if you choose so. Go to your “Settings” app, select “iTunes & App Store” and untick the toggle next to “Updates” to disable some of the automatic downloads, or all of the options. You can still download any of them manually.
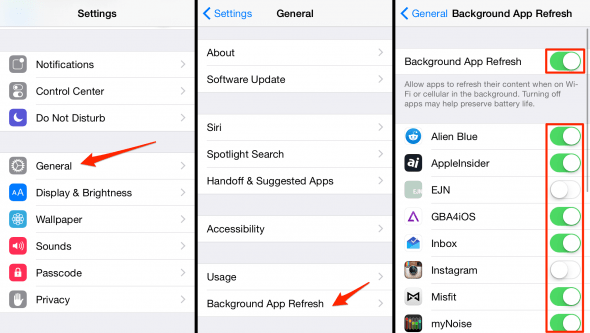
Another feature that is quite handy and comfortable, but might be taxing on your iPhone battery life and performance, would be the so-called “Background App Refresh”. What this does is to fetch content that will be displayed within apps, so it is already there when you want to view it. While faster, it takes up resources.
Go to your “Settings” app, select the section labeled “General” and untick “Background App Refresh” either globally by tapping the switch at the top, or try a more selective approach by unticking any apps you don’t really need to update in the background.
Close unresponsive apps
Typically, your iPhone will manage all currently running tasks rather efficiently and requires little to no intervention. Some apps, however, tend to lock up and eat up system resources while backgrounded. This is especially the case with apps that rely knowing on your current location.
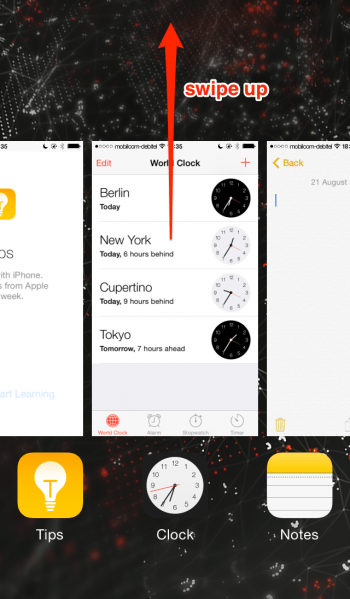
Double-tap the Home Button to view the app switcher. Then swipe up on the respective app to close its running process and terminate it.
Disable Wi-Fi search
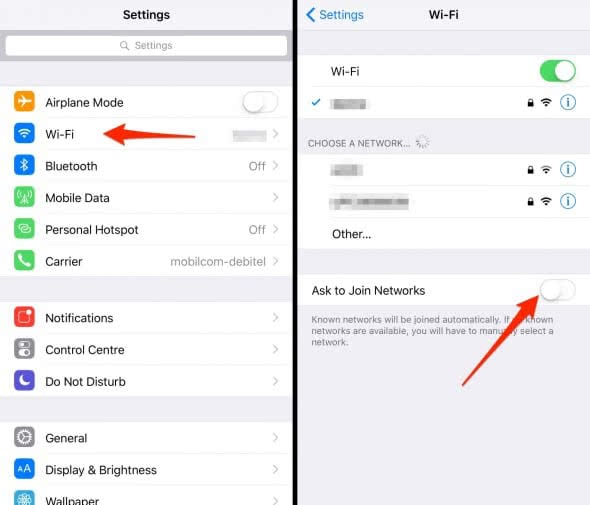
Settings → Wi-Fi → Ask to Join NetworksWhile out and about, your iPhone will check for open wireless networks for you to join. To inhibit this behavior, we can disable a toggle that can be found in the “Wi-Fi” menu of your “Settings” app. Tap the switch next to “Ask to Join Networks” to turn this feature off.
Disable System Services
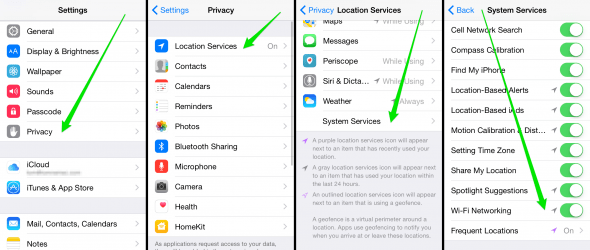
Settings → Privacy → Location Services → System ServicesA lot of the location-based “System Services” are not needed for the operation of your iPhone. We can disable them to conserve battery life and maybe even squeeze out an extra bit of performance. Go to your “Settings” app to begin.
Then navigate to the section labeled “Privacy”, select the “Location Services” and finally the “System Services”. Feel free to deactivate any of these features, while we suggest keeping on “Find My iPhone” at the very least.
Delete photos and videos
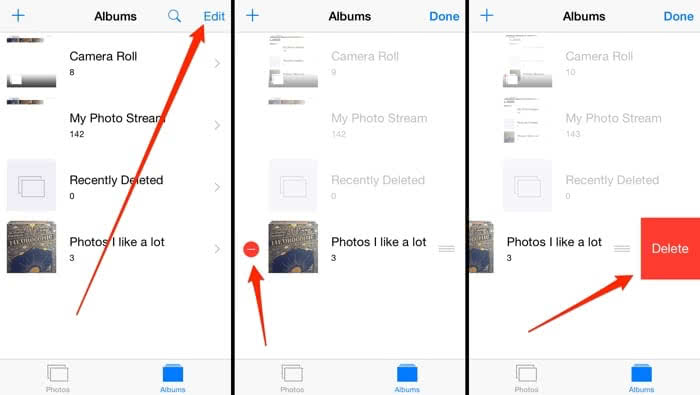
Getting rid of any photos and videos you don’t need will free up some space on your iPhone, which leaves more for the system to work with. Remember? Free space is always useful, as stated at the beginning of this guide. Tap the trash can icon and select e.g. “Delete Photo” to delete a single image. See this guide for more…
Reduce Motion and/or transparency
Settings → Accessibility → Motion → Reduce MotionThis will probably have a very noticeable effect on your iPhone’s performance: The animation effects introduced in the latest versions of iOS surely take a toll on the processor and result in lag or stuttering on older hardware.
Luckily, Apple left us the freedom of disabling some of these effects by going through the accessibility options. To begin, open up your “Settings” app. Go to “Accessibility” and tap on “Motion”. Switch on the toggle next to “Reduce Motion” to disable the zooming animations and replace them with a smooth fade. Your iPhone should feel snappier pretty much right away.
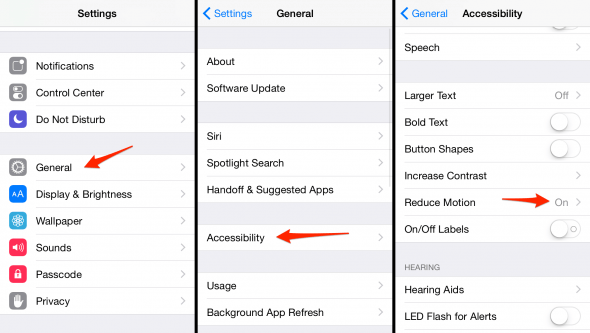
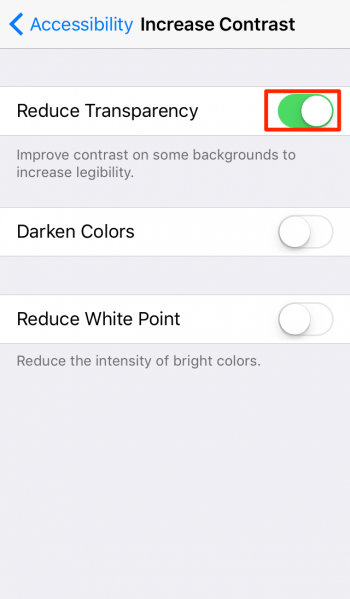
Another layer of effects is found in the Accessibility menu as well. Open the “Settings” app, go to “Accessibility” and select “Display & Text Size”. Then tap the button next to “Reduce Transparency”. This should also give your iPhone quite a boost.
Reboot your iPhone
Last but not least, it is always a great idea to reboot your iPhone from time to time, which will fix a lot of intermittent issues and clean up some of the caches.
Remember your Windows computer from a couple of years ago? It pretty much had to reboot for every other installation. Fortunately, iOS is a lot more advanced than the operating systems we used to work with in the past. Nevertheless, you can initiate a full restart by pressing and holding the Home Button and the Sleep/Wake Button for a couple of seconds, or until you see the Apple logo. Then let go of both buttons. Your iPhone might feel snappier afterwards, give it a try! If you have an iPhone 7, iPhone 7 Plus, iPhone 8, ihone 8 Plus or an iPhone X there is a different way to reset your iPhone.
- Learn how to reboot your iPhone X
- Learn how to reboot your iPhone 8/ reboot iPhone 8 Plus
- Learn how to reboot your iPhone 7/ reboot iPhone 7 Plus
If your iPhone battery drains fast, you can also try these tips to prevent battery drain.